 Save
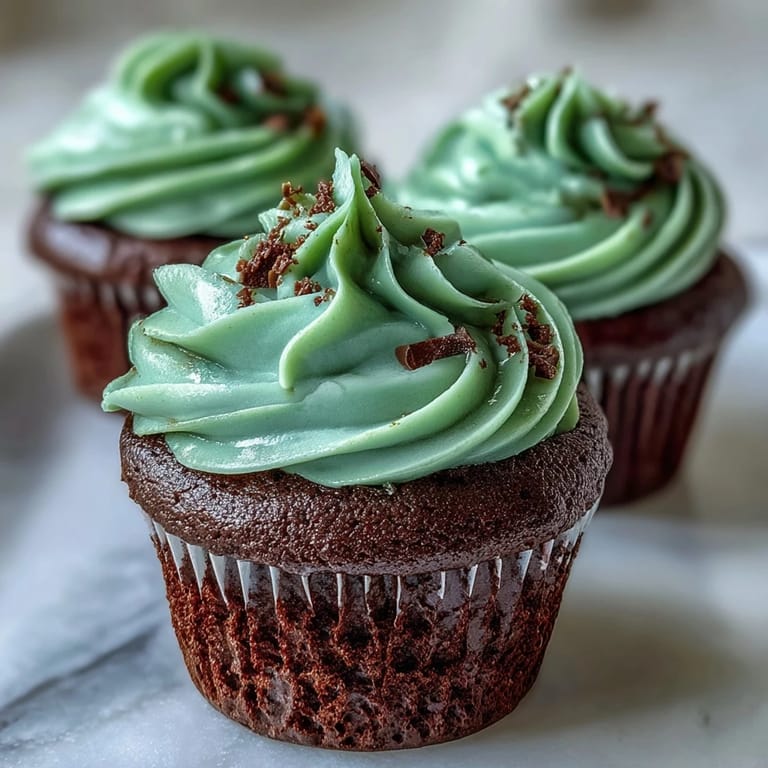
Save My neighbor showed up at my door one March afternoon with a box of green velvet cupcakes she'd made for her daughter's school party, and I couldn't stop thinking about them for days. The color was so vibrant and unexpected, nothing like the heavy, overly sweet green desserts I'd seen before—these were elegant, subtle, with just a whisper of chocolate underneath. I finally decided to recreate them, and after a few batches and some experimenting with the shade of green, I landed on this version that feels like pure celebration in cupcake form. There's something about baking these that makes any room feel festive, even when it's not technically a holiday.
I made these for my coworkers' potluck last year, and watching people's faces light up when they realized they weren't just food coloring and sugar was genuinely rewarding. One guy who claimed he wasn't a dessert person ate three, which tells you everything you need to know.
Ingredients
- All-purpose flour: This is your foundation—make sure it's measured by weight if you can, since it prevents that dense, heavy texture that ruins velvet cakes.
- Unsweetened cocoa powder: The small amount is what makes people pause and say they taste something they can't quite identify, which is exactly the point.
- Baking soda: Works with the vinegar and sour cream to give you that tender, almost feathery crumb.
- Unsalted butter: Room temperature is non-negotiable here—cold butter won't cream properly and you'll lose that light, airy texture.
- Granulated sugar: Don't skip the creaming step; this is where air gets incorporated and changes everything.
- Eggs: Room temperature eggs blend seamlessly into the batter without creating lumps or breaking the emulsion.
- Buttermilk and sour cream: Together they create that signature tender crumb and tangy undertone that makes these different from regular chocolate cupcakes.
- Green food coloring: Gel coloring is worth seeking out because liquid food coloring adds too much moisture and turns the batter thin.
- White vinegar: It sounds odd but it reacts with the baking soda to create lift and also enhances the flavor depth.
- Cream cheese: Softened means it should be almost spreadable; cold cream cheese will get lumpy and grainy in the frosting.
- Powdered sugar: Sift it before adding to avoid lumpy frosting that feels gritty.
Tired of Takeout? 🥡
Get 10 meals you can make faster than delivery arrives. Seriously.
One email. No spam. Unsubscribe anytime.
Instructions
- Get everything ready:
- Preheat your oven to 350°F and line your muffin tin with liners while you're thinking about it—it's easier than scrambling later. Having all your ingredients at room temperature is the difference between a smooth batter and one that looks curdled and stressed.
- Mix the dry team:
- Whisk flour, cocoa powder, baking soda, and salt together in a medium bowl until you don't see any streaks of cocoa. This distributes the leavening evenly so you won't get weird bumpy tops.
- Cream the butter and sugar:
- Beat them together for about two full minutes until it looks pale and fluffy, almost like frosting itself. This aerates the batter and is worth the time investment.
- Add the eggs one at a time:
- Beat well after each egg so it fully incorporates before you add the next one. Rushing this step is how you end up with a broken, oily-looking batter.
- Build the wet mixture:
- Pour in buttermilk, sour cream, and vanilla, then add your green coloring drop by drop until you reach the shade you want. The mixture will look thin and slightly curdled at this point, which is completely normal.
- Add the vinegar at the end:
- Stir it in just before you combine everything—it activates the baking soda and creates those tender crumbs.
- Gently fold everything together:
- Add the dry ingredients to the wet ingredients and mix just until you don't see streaks of flour. Overmixing develops gluten and makes them tough, so resist the urge to keep stirring.
- Fill and bake:
- Divide the batter evenly so all your cupcakes bake at the same speed, filling each liner about two-thirds full. Bake for 16 to 18 minutes until a toothpick comes out clean but not completely dry.
- Cool with patience:
- Let them sit in the pan for five minutes before moving to a cooling rack, which prevents them from breaking apart. They need to be completely cool before frosting or the frosting will melt.
- Make the frosting:
- Beat cream cheese and butter until it looks smooth and creamy, then gradually add sifted powdered sugar so you don't create a cloud. The gradual approach also prevents lumps from forming.
- Frost and celebrate:
- Once cupcakes are cool, spread or pipe the frosting on top—a piping bag gives you more control and looks prettier if you're bringing these somewhere. A small offset spatula works beautifully if you prefer a more rustic look.
 Save
Save There's a moment while these are cooling in the kitchen when the smell hits you—subtle chocolate mixed with something almost minty from the cocoa—and you realize you've made something that feels special. My daughter once asked if we could make these for her birthday instead of a traditional cake, and we absolutely did.
The Color Question Everyone Asks
People always assume these are just green food coloring dropped into vanilla cake, but the cocoa is what gives them character and prevents them from tasting like frosting with a cake chaser. If you want a deeper, more sophisticated green, use gel coloring and let it sit in the batter for a minute—the color develops slightly as it sits. Some bakers add a tiny drop of blue to prevent that yellowish-green situation, which is a sneaky trick worth knowing.
Why This Frosting Works
Cream cheese frosting is tangy enough to cut through the sweetness of the cupcake, which keeps your palate from getting tired halfway through. The butter gives it that silky texture that cream cheese alone wouldn't have, and the vanilla keeps everything tasting balanced instead of one-dimensional. This frosting is actually stable enough to pipe, which makes these cupcakes look bakery-quality without any special skills.
Making Them Your Own
Once you've made these once and they turn out, you'll start experimenting—and that's the fun part. Some versions add a tiny bit of mint extract for freshness, while others include a chocolate chip hidden in the center. You could also try white chocolate shavings on top, crushed candies, or even a light dusting of edible pearl dust if you're feeling fancy.
- A drop of peppermint extract instead of the vanilla creates something that feels almost holiday-specific without being obvious.
- Make the frosting slightly less sweet by reducing powdered sugar by a quarter cup if you prefer a more balanced flavor.
- These keep beautifully in an airtight container for three days, so you can make them ahead and frost the night before serving.
 Save
Save These cupcakes have become my go-to when I want to celebrate something without overthinking it. There's something about the unexpected green color combined with that whisper of cocoa that makes people smile before they even taste them.
Recipe FAQs
- → How can I achieve a deeper green color?
Use gel food coloring instead of liquid to intensify the green without affecting batter consistency.
- → What ingredient gives the cupcakes a moist texture?
Buttermilk and sour cream contribute moisture and tenderness to the cupcake crumb.
- → Can I prepare the frosting ahead of time?
Yes, cream cheese frosting can be made in advance and refrigerated for up to 2 days; bring to room temperature before frosting.
- → What is the best way to check doneness?
Insert a toothpick into the center; it should come out clean or with a few moist crumbs when cupcakes are done.
- → Are there suggested pairings for these cupcakes?
They pair wonderfully with Irish coffee or a simple glass of milk for a balanced flavor experience.